React-Native Push Notifications with Expo in a Managed Workflow
In this article we will explore adding Push Notifications to your existing Expo App, using Expo’s push notification service. We will not be using third party push notification services such as OneSignal. This article will cover scaffolding, sending, receiving and testing push notifications on both Android and iOS.
Contents:
1. Push Notification Hook
2. Android Implementation
3. iOS implementation
4. Testing
5. Additional Reading
Pre-requisites:
- An Expo Application Services (EAS) Account
- A Firebase Account
- A physical mobile device
- EAS Client (npm i eas-cli@latest)
- The latest version of the Expo SDK (recommended)
Push Notification Hook
Lets begin by writing a custom hook to handle push notifications in our React-Native Expo application. This hook is a reusable utility designed to simplify and centralize the process of integrating push notifications in an Expo-powered React Native application. It abstracts the complexities of setting up push notification permissions, registering the device for push notifications, and managing notification handling.
1. Install the required packages in our terminal.
Please note that this tutorial is for an Expo App with a Managed Workflow, meaning that Expo will handle the native code for you and you do not need to configure or install native dev tool like Android Studio or Xcode. That being said for a Managed Workflow it is assumed that the Expo global CLI is installed (npm install -g expo-cli).
expo install expo-device
expo install expo-notifications
expo install expo-constants
After installing the required dependencies we can commence writing the usePushNotifications hook:
2. Import the necessary modules.
Be advised that for the purposes of the tutorial we are using JavaScript, it is highly advisable to use TypeScript when working with an Expo app. Expo also supports TypeScript out of the box and provides first-class support, improving developer experience overall.
import { useState, useEffect, useRef } from "react";
import * as Device from "expo-device";
import * as Notifications from "expo-notifications";
import Constants from "expo-constants";
import { Platform } from "react-native";
3. Now, lets initialize some state variables:
const [expoPushToken, setExpoPushToken] = useState(null);
const [notification, setNotification] = useState(null);
const notificationListener = useRef(null);
const responseListener = useRef(null);
- expoPushToken: Stores the device’s unique Expo Push Token for sending notifications.
- notification: Stores the details of the most recently received notification.
- notificationListener: A ref to manage the subscription for notifications received while the app is running.
- responseListener: A ref to manage the subscription for user responses to notifications.
4. Write a function to to Register Push Notifications
const registerForPushNotifications = async () => {
  if (!Device.isDevice) {
    alert("Must use a physical device for push notifications.");
    return null;
  }

  const { status: existingStatus } = await Notifications.getPermissionsAsync();
  const finalStatus =
    existingStatus === "granted"
      ? existingStatus
      : (await Notifications.requestPermissionsAsync()).status;

  if (finalStatus !== "granted") {
    alert("Failed to get push notification token.");
    return null;
  }

  const token = await Notifications.getExpoPushTokenAsync({
    projectId: Constants.expoConfig?.extra?.eas?.projectId,
  });

  if (Platform.OS === "android") {
    await Notifications.setNotificationChannelAsync("default", {
      name: "default",
      importance: Notifications.AndroidImportance.MAX,
      vibrationPattern: [0, 250, 250, 250],
      lightColor: "#FF231F7C",
    });
  }

  return token;
};
In this function we simply verify if the app is running on a physical device as the notifications do not work on simulators or emulators. If you are using Expo Go for testing, the notifications can be received however working with the data received from the notification can be inconsistent.
We also check if the app has permissions the send notifications and request for permission if not using requestPermissionAsync.
Thereafter we generate an Expo Push Token using getExpoPushTokenAsync. The Expo Push token is imperative as it it connects the server to the correct device, allowing for targeted, permission-based delivery of notifications. It helps ensure that notifications are sent to the right user, with the right content, and only to devices that have granted permission.
We then setup a notification channel for Android devices by specifying properties like importance, a vibration pattern and a colour for android devices. Finally we return the token or null if the registration failed.
5. useEffect for registering and adding listeners when the component mounts.
useEffect(() => {
  const setupNotifications = async () => {
    const token = await registerForPushNotifications();
    if (token) setExpoPushToken(token);

    notificationListener.current = Notifications.addNotificationReceivedListener(setNotification);
    responseListener.current = Notifications.addNotificationResponseReceivedListener(console.log);

    return () => {
      Notifications.removeNotificationSubscription(notificationListener.current);
      Notifications.removeNotificationSubscription(responseListener.current);
    };
  };

  setupNotifications();
}, []);
We store the Expo Push Token in the expoPushToken state after calling the registerForPushNotification function. Thereafter we add listeners (addNotificationListener, addNotificationResponseReceivedListener) to listen for notifications and update the the notification state with the notification details as well as listen for user interaction while logging the response (Expo Push Token) in the console.
6. Return the unique token as well as details of the most recent notification received.
return { expoPushToken, notification };
Full code for usePushNotification.js :
import { useState, useEffect, useRef } from "react";
import * as Device from "expo-device";
import * as Notifications from "expo-notifications";
import Constants from "expo-constants";
import { Platform } from "react-native";

const [expoPushToken, setExpoPushToken] = useState(null);
const [notification, setNotification] = useState(null);
const notificationListener = useRef(null);
const responseListener = useRef(null);

const registerForPushNotifications = async () => {
  if (!Device.isDevice) {
    alert("Must use a physical device for push notifications.");
    return null;
  }

  const { status: existingStatus } = await Notifications.getPermissionsAsync();
  const finalStatus =
    existingStatus === "granted"
      ? existingStatus
      : (await Notifications.requestPermissionsAsync()).status;

  if (finalStatus !== "granted") {
    alert("Failed to get push notification token.");
    return null;
  }

  const token = await Notifications.getExpoPushTokenAsync({
    projectId: Constants.expoConfig?.extra?.eas?.projectId,
  });

  if (Platform.OS === "android") {
    await Notifications.setNotificationChannelAsync("default", {
      name: "default",
      importance: Notifications.AndroidImportance.MAX,
      vibrationPattern: [0, 250, 250, 250],
      lightColor: "#4A90E2 ",
    });
  }

  return token;
};

useEffect(() => {
  const setupNotifications = async () => {
    const token = await registerForPushNotifications();
    if (token) setExpoPushToken(token);

    notificationListener.current = Notifications.addNotificationReceivedListener(setNotification);
    responseListener.current = Notifications.addNotificationResponseReceivedListener(console.log);

    return () => {
      Notifications.removeNotificationSubscription(notificationListener.current);
      Notifications.removeNotificationSubscription(responseListener.current);
    };
  };

  setupNotifications();
}, []);

return { expoPushToken, notification };
Android Implementation
Now that we have created the hook for the Notifications lets take a look at how we implement this for Android. We’ll start off by adding Firebase to our Android app.
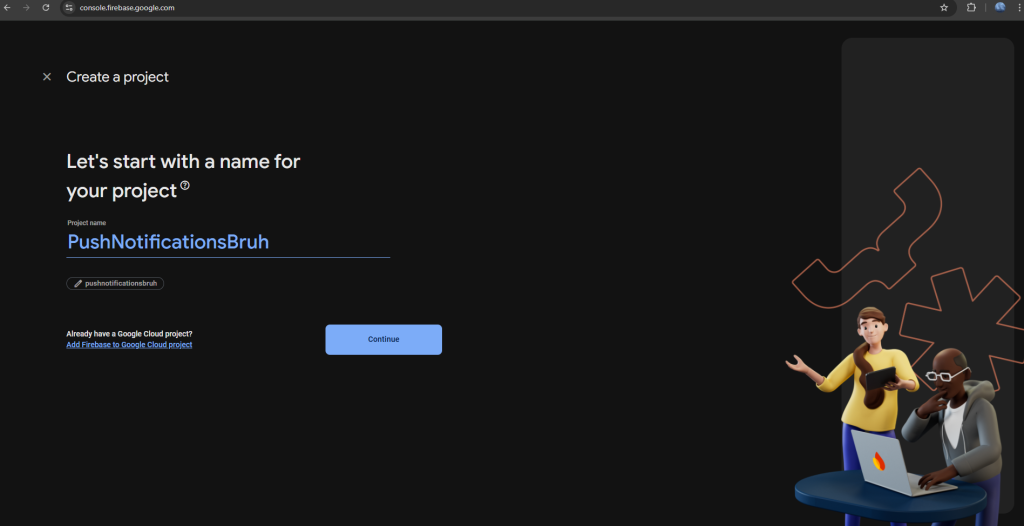
1. Create a new Firebase project for your app
The process is quite straight forward, simply navigate to the Firebase console and add a new project. Choose the Default Account and hit Create Project.
2. Let’s generate our Android Folder
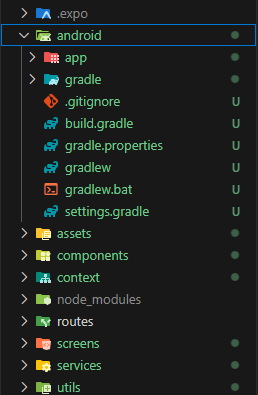
Since we are using a Managed Workflow we by default do not have an Android or iOS folder. To add Firebase to our app for android we are going to need to generate an android folder. We do this by running the following command in the terminal.
npx expo prebuildAfter running the command you will be prompted to name your Android package, for this tutorial I am going to use a default name for my app : com.example.pushnotification.
If the prebuild was successful you should see an android folder in your project like so:
3. Register and Add google-services.json
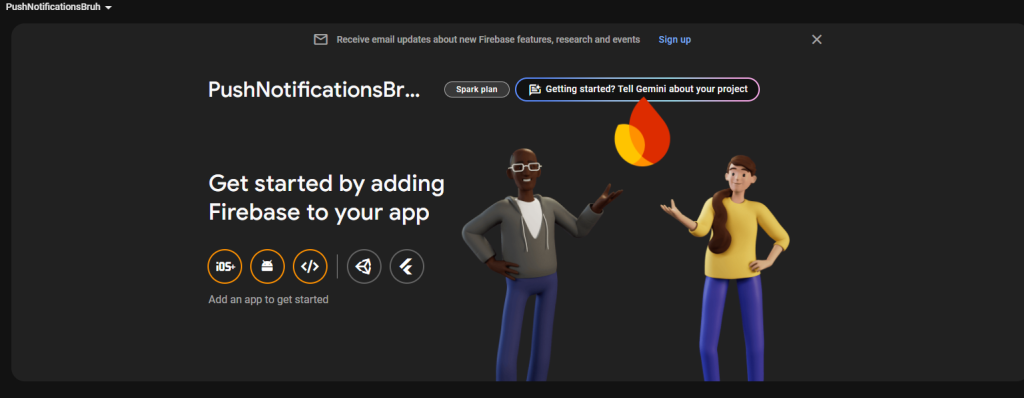
After prebuilding and generating your android folder, navigate back to your Firebase console and select your project. We are now going to add Firebase to our app.
Select the android icon as we are currently focused on the Android Implementation and wont be needing Firebase for iOS.
Thereafter register your app and ensure that you have entered the correct Android package name. From earlier, when we generated the android folder, I opted to use the default name: com.example.pushnotification.
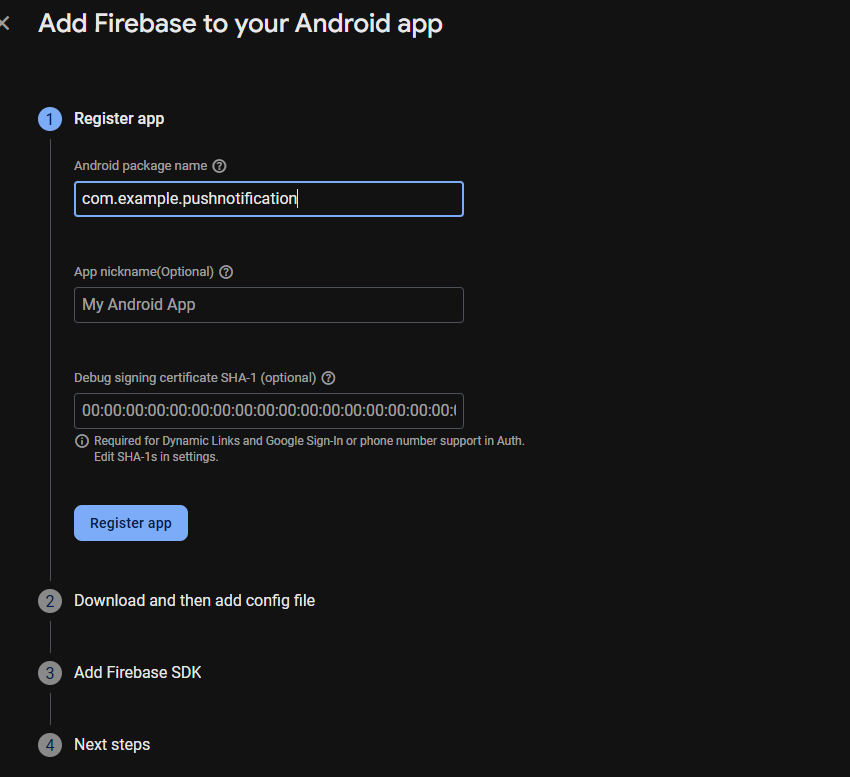
The next step is to register the app and download the google-services.json file.
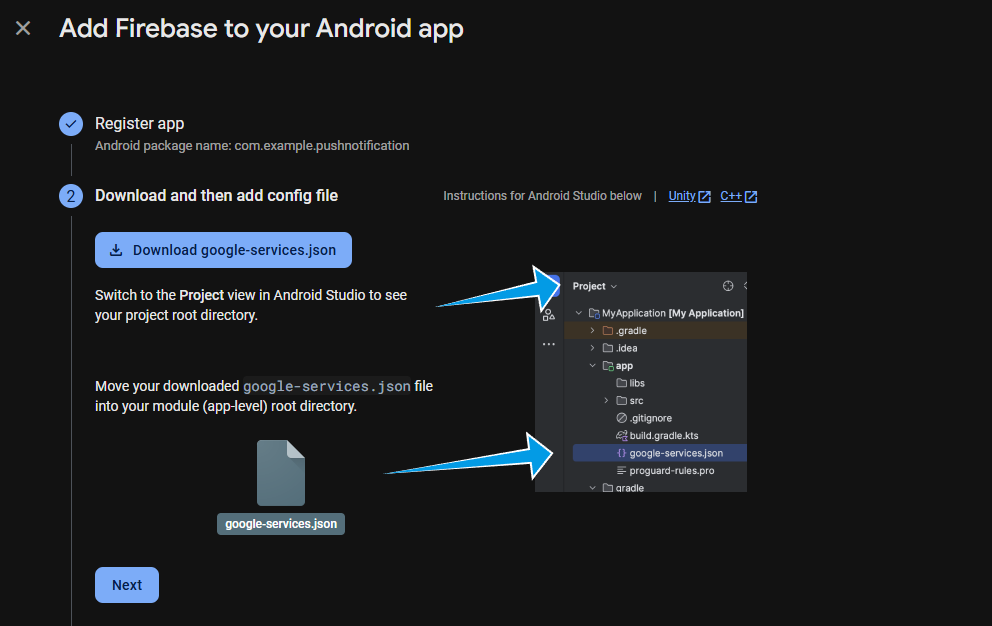
We are now going to place the google-services.json folder into the the Android src folder, located inside of the app folder. The path is as follows: android/app/src. As shown below:
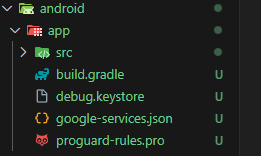
Finally navigate to the app.json in your project and specify the google services file you added:

4. Register your build with EAS
Since we are using Expo’s Push Notification Service we need to register our build with EAS for access to the service and token to send push notifications to devices using Expo’s platform. We’ll begin by running an eas build command in our terminal. Ensure you select Android as the platform. For the login, use your EAS credentials.
eas login
eas build
This command prepares a build environment and automates the process of building your React Native/Expo app for deployment to app stores (like the Apple App Store and Google Play Store). ‘eas build’ streamlines the app building process by handling everything from dependency resolution to generating app artifacts, making it much easier to build and distribute your Expo/React Native app.
During the build process you will be greeted by config options like creating and linking your project to EAS , simply type yes for all as this helps streamline the build process by allowing Expo to handle all necessary configurations, credential generation, and updates automatically.
Important to Note:
There could be instances where your build might fail. This could be for a number of reasons and it is quite helpful to view the build logs in the EAS dashboard – https://expo.dev.
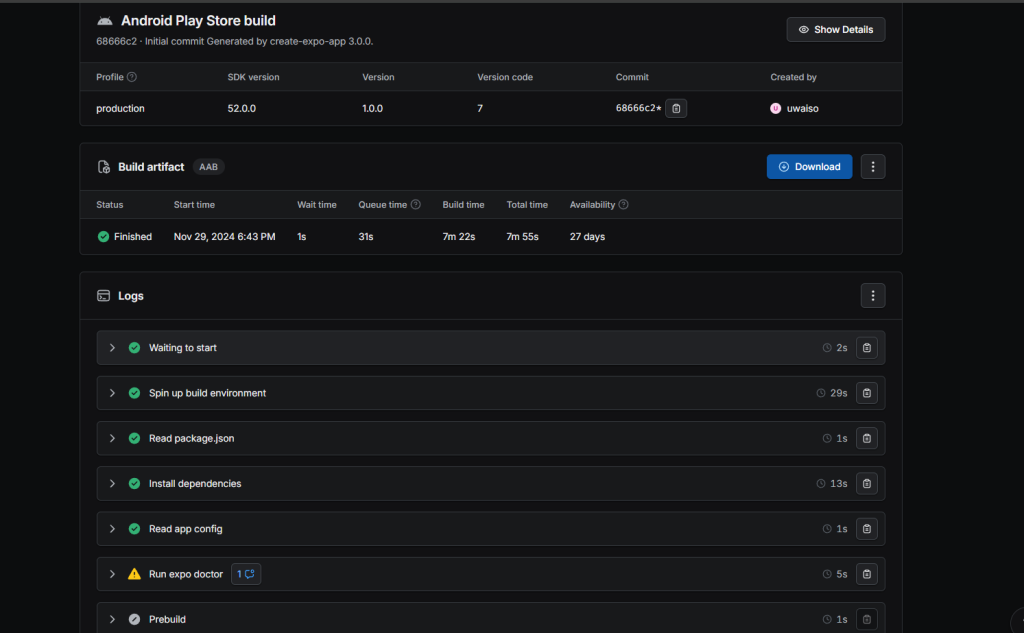
A common issue I found when attempting to build was dependency version conflicts as well Expo SDK incompatibility, hence why I’d recommend upgrading to the latest Expo SDK version as well using the command:
npx expo-doctorExpo doctor is a command in the Expo CLI that checks your project for issues related to its configuration, dependencies, and environment. It ensures your project is correctly set up and ready to run or build, with a particular focus on resolving version mismatches and compatibility issues.
5. Generating a Private Key and adding it to EAS
After running successfully building your project on EAS we are now going to generate a Private Key on Firebase and add it to EAS. Generating a private key on Firebase (Firestore) and adding it to EAS is necessary for enabling push notifications on Android because Firebase Cloud Messaging (FCM) is the underlying service that delivers these notifications. The private key, usually in the form of a service account JSON file, contains credentials required for your app to authenticate with FCM. By uploading this key to EAS, you allow Expo to manage push notification delivery on your behalf, ensuring that your Android app can securely receive and handle notifications sent via Expo’s notification services.
To achieve this we are going to navigate to our Firebase project and go to the Service Accounts tab and click on “Generate new Private Key”:
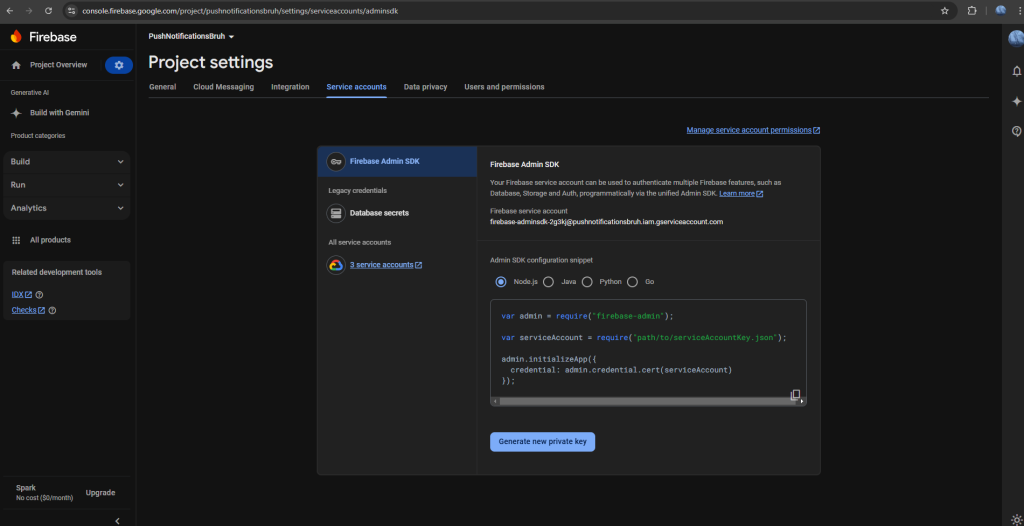
Afterwards navigate to your EAS dashboard and select the Credentials section in the side nav of your project:
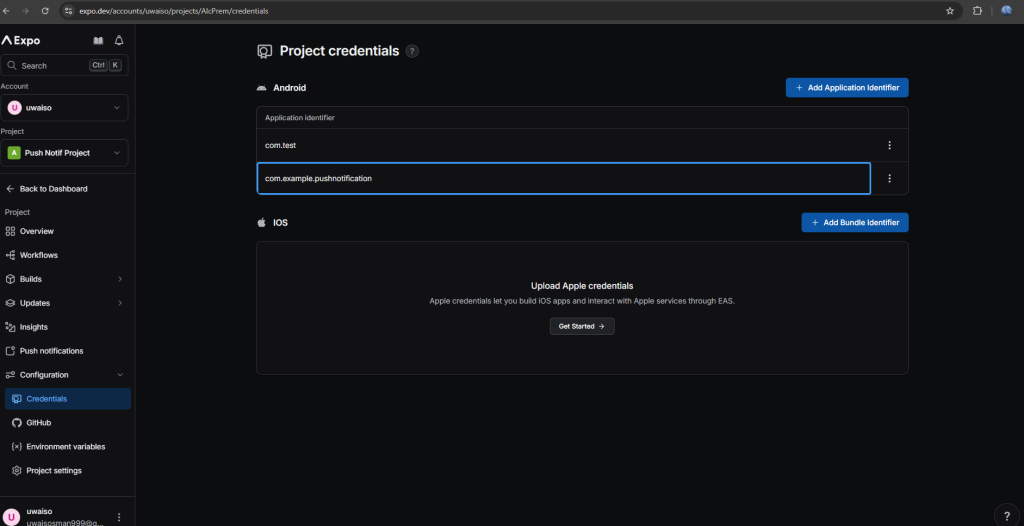
You should see your Android project name under the android section as I see mine. Click on it and scroll down to the FCM V1 service account key section. We are going to add our Private Key that we generated on Firebase here. After adding it your tab should look similar to mine:

And there you have it! You have successfully configured Push Notifications using EAS for your android application!
iOS Implementation
The iOS setup for push notifications is much simpler and faster as compared the android.
To begin we will run ‘eas build’ as we did for android and select iOS as the platform. Here, like android, you’ll be given configs such as creating an EAS project and linking it from local to EAS. Then you will be prompted to setup Push notifications, type yes and continue ensuring you select the default notifier. Like android you can simply select yes for all the configurations as it reduces the manual need to add and link your project to EAS. Here’s a snippet of what your terminal might look like:
✔ Reading EAS configuration
✔ Verified app configuration
✔ iOS project configured correctly

› Log in to your Apple Developer account to continue.
✔ Apple ID: [your-email@example.com]
✔ Logged in successfully
✔ Team: [Your Team Name (Team ID)]

✔ Checking for existing Apple credentials...
✔ Successfully fetched Apple credentials
✔ All credentials validated

✔ Starting iOS build...
Build details: https://expo.dev/accounts/username/projects/project-name/builds/build-id
And now we have successfully configured Push Notifications for iOS!
Testing
Now for the fun part! As mentioned earlier it is important to note that you cannot test push notifications on a simulator or emulator. It is preferrable to use a physical device to ensure smooth and accurate testing.
1. Call your hook on startup
We need to call our PushNotification hook preferably on start up so that it logs the ExpoPushToken. I added mine to my App.js but you are free to place it where you’d like depending on use case and requirements. To make testing quick and easy, I have done mine like so:

2. Run the app and get the Token
Run your application by using the following command:
//ios
npx expo run: ios --device

//android
npx expo run: android --device

//Expo go
npx expo start
After your device is connected and your application has successfully connected and ran. We are going to open the app and inspect the console for a push token. It should look like this :
                                                 //Copy the token below
Expo Push Token: {"data": "ExponentPushToken[<your-push-token>]", "type": "expo"}
3. Lets Send a Push Notification !
Head over to expo.dev/notifications. This is EAS’s Push notification tool for testing. Lets fill out the required fields to finally see our notification in action.
Make sure your push token is in the correct format and includes the square brackets and that the android channel id is default.

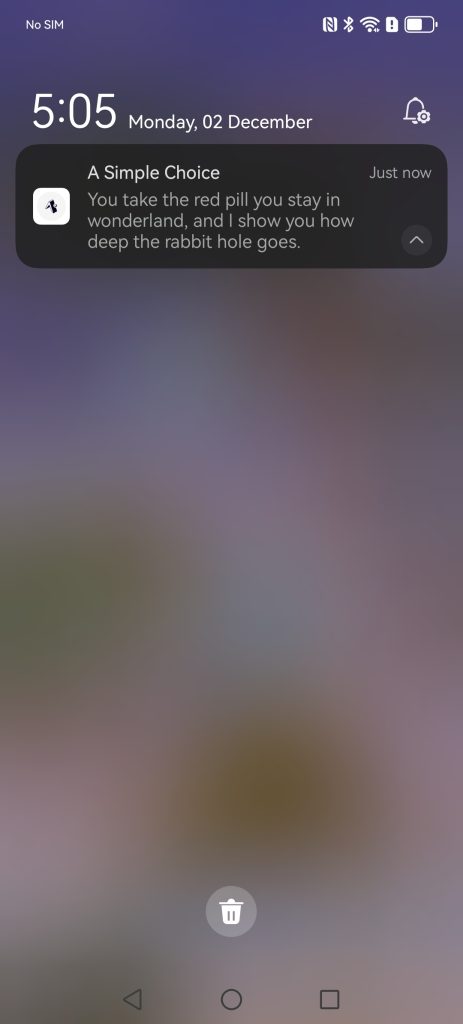
The Result !
Additional Reading
The Expo Push Notification API
The Expo Push Notification API simplifies sending notifications to devices registered with Expo services. Using tools like Postman, you can test push notifications by making POST requests to the Expo Push API (https://exp.host/–/api/v2/push/send). The API accepts JSON-formatted requests that include the target device’s Expo push token (to), the notification title, body, and optional data payloads. This setup is beneficial for quick testing and debugging, ensuring notifications behave as expected before integrating into a backend. If building a backend in Node.js or C#, you can format the JSON payload accordingly and use HTTP client libraries like Axios (Node.js) or HttpClient (C#) for sending requests.
Example Testing with Postman

Expo Rate Limit
Expo push notifications are subject to a rate limit of 100 notifications per second, which is sufficient for small to medium-sized projects. This means you can send up to 6,000 notifications per minute, making it ideal for projects with moderate user bases. While this rate might seem restrictive for larger applications with thousands of concurrent users, it is well-suited for smaller apps or those with niche audiences. If you exceed the rate limit, Expo queues your notifications and delivers them as capacity becomes available, ensuring no messages are lost. For larger-scale projects, developers can implement notification batching or explore alternatives like OneSignal or Firebase Cloud Messaging. However, for projects already using Expo, the built-in service offers a streamlined and cost-efficient way to handle push notifications without the need for third-party services or custom setups.
Expo Push Notifications vs. OneSignal Push Notifications in Expo Managed Workflow
Expo Push Notifications
Pros:
- Seamless Integration: Expo push notifications are built to work natively with Expo’s managed workflow, requiring no native code configuration or third-party services. This simplifies setup and use.
- Cost-Effective: Expo push notifications are free to use with no tiered pricing for small to medium-scale projects. There are no hidden fees based on the number of notifications or users.
- Simplicity: With Expo, developers can easily implement push notifications with minimal configuration, leveraging Expo’s unified development environment.
- No Ejection Needed: Expo push notifications work well out-of-the-box within the managed workflow, meaning you don’t need to eject your project to access them.
Cons:
- Rate Limits: Expo imposes a limit of 100 notifications per second, which may not scale well for high-traffic apps.
- Basic Features: While Expo’s push notifications are easy to implement, they are more basic and may lack some advanced features like detailed segmentation, analytics, or multi-channel messaging (email, SMS) offered by other services like OneSignal.
- No Built-in Analytics: Expo doesn’t offer in-depth analytics on push notifications (e.g., open rates, user engagement), which is a feature OneSignal provides.
OneSignal Push Notifications
Pros:
- Advanced Features: OneSignal offers advanced push notification features like segmentation, targeting, A/B testing, and detailed analytics, which can help optimize user engagement.
- Multi-Channel Messaging: Beyond push notifications, OneSignal supports other communication channels like email and SMS, making it a more versatile solution for customer engagement.
- Customizable: OneSignal allows greater flexibility in customizing notification content, delivery times, and other parameters, which can help tailor the user experience.
Cons:
- Complex Setup: OneSignal doesn’t integrate as seamlessly with Expo’s managed workflow and often requires ejecting the project to the bare workflow or adding native dependencies. This adds complexity and reduces the advantages of Expo’s managed environment.
- Third-Party Service: Using OneSignal means relying on an external service, which may introduce delays, downtime, or service changes outside of your control.
- Pricing for Larger Projects: While OneSignal offers a free tier, its more advanced features are behind a paywall. Costs can increase with larger user bases or more extensive usage, especially for features like in-depth analytics or high-volume notifications.
WRITTEN BY
Uwais Osman