Creating a Vite Federated Frontend Application: A Step-by-Step Guide
by Alex Ellis
Published on: 5/21/2024
Creating a Vite Federated Frontend Application: A Step-by-Step Guide
Introduction
Micro-frontends (MFs) have gained popularity as a way to split large applications into smaller, more manageable pieces. With the introduction of Webpack 5’s Module Federations, building micro-frontends has become even easier. In this tutorial, we’ll create a Vite federated frontend application using npm, React.js, and Tailwind CSS.
Prerequisites
Before we begin, make sure you have the following installed:
- Node.js (npm)
- Yarn (optional but recommended)
Step 1: Setting Up the Host Application
- Create a new Vite project for the host application:
npm create vite@latest host-app --template react - Navigate to the project directory
cd host-app
Step 2: Creating a Micro-Frontend
- Inside the
host-appdirectory, create a new directory for your micro-frontend:mkdir vite && cd vite - Generate a Vite project for your micro-frontend:
yarn create vite pokemons-list --template react-ts - Install necessary packages for your micro-frontend:
cd pokemons-list yarn add jotai
Step 3: Configuring Module Federations
- In your vite.config.ts file (located in the pokemons-list directory), configure the federation plugin:
- Create your micro-frontend components and state in the src folder.
Step 4: Consuming the Micro-Frontend
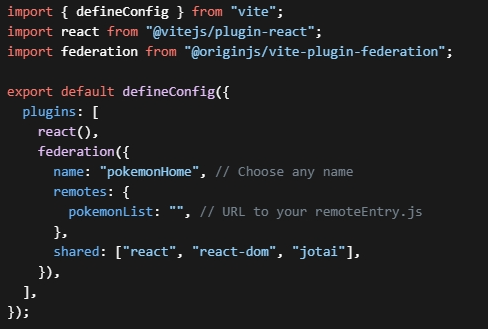
- Create another Vite project for your host application (e.g. pokemon-home)
- Configure the federation plugin in the host application’s
vite.config.ts: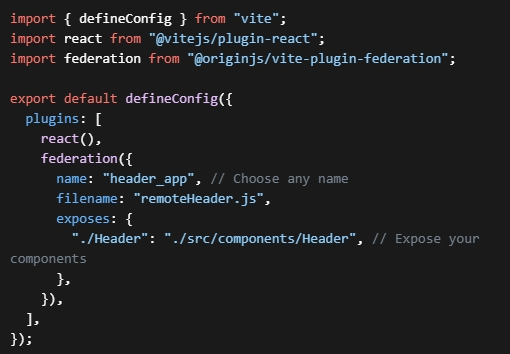
- Import and use the exposed components in your host application.
Conclusion
Congratulations! You’ve successfully set up a Vite federated frontend application using Module Federations. Feel free to explore more features and build additional micro-frontends as needed.
I hope you find this blog helpful! If you have any questions or feedback, feel free to leave a comment below. Happy coding! 😊

WRITTEN BY
Alex Ellis