A New Era for Regression Testing: Getting Started with Automation Testing Using Playwright
Introduction
In my early days at Runninghill, a challenge appeared: introduce automation testing to the team. With scant details from my senior, I grasped the gravity of the issue. The client’s testers, heavily reliant on manual methods, were missing key details, leading to major problems. Automation was the missing piece. Daunting? Yes. Especially for a green graduate like me. But it was clearly the path forward.
Automation testing has revolutionized the software development industry, offering an efficient and reliable way to verify application functionality. In this comprehensive blog post, I’ll guide you through my journey of getting started with Playwright, walking you step-by-step through the process and offering valuable insights to help you harness its full potential for automation testing.
Understanding Regression Testing: The Birthplace of Automation Tools
Even if you’re familiar with regression testing, it’s worth diving deeper to understand its significance. At its core, regression testing is employed to ensure that any changes—be it modifications, updates, or improvements to the code—do not adversely affect the existing functionalities of an application.
This is crucial because any software, especially enterprise applications, continuously evolves. With each change, there’s a risk: what if the new code breaks an existing feature? What if it introduces new bugs? Regression testing is our safety net, ensuring that the software remains stable and efficient with every new iteration. In the Agile world, this safety net is paramount, ensuring that every change aligns with the system’s overall operations. Hence, before any modifications become part of the main development branch or get deployed to staging environments like SIT, UAT, and Production, they are rigorously tested.
Yet, despite its significance, regression testing is not without its challenges. These challenges have paved the way for automation tools like Playwright.
The Challenges of Regression Testing:
Repetitiveness: Every new code change requires us to run the same tests over and over. This repetition, especially in extensive applications, can significantly slow down the development pace.
Time-Intensive: Beyond the tests themselves, even the setup—particularly in intricate domains like insurance—can be lengthy and cumbersome.
Prone to Errors: With extensive manual testing comes the risk of human errors. A missed step or a misjudged result can lead to undetected defects.
Given these challenges, isn’t there a need for a more efficient, error-free approach? Enter: Automation Testing. If you’ve ever felt that regression testing is a drawn-out dance, automation testing might just be the rhythmic shortcut you’ve been yearning for!
Automation Testing
The Importance of automation testing
- Efficiency and Time-Savings: Automation testing accelerates the software development process and ensures rapid and thorough testing of application functionality.
- Early Error Detection: It aids in identifying bugs and errors early in the development cycle, minimizing potential setbacks.
- Handling Complexity: Enables testing of intricate scenarios that are challenging to simulate manually.
- Enhanced Application Quality: By eliminating the risk of human oversight and reducing the need for manual testing, it enhances overall application quality and user experience.
- Cost-Efficiency: In the long run, it can lead to significant cost savings by preventing expensive errors from going unnoticed and reducing manual testing efforts.
- Stability: Ensures that software updates or fixes don’t negatively impact existing functionalities.
Playwright: Your Automation Ally
What is Playwright?
Crafted by Microsoft, Playwright is a robust Node.js library that automates browser tasks across various platforms like Chromium, Firefox, and WebKit. Through its unified API, it empowers developers to devise, test, and validate web applications across a multitude of browsers and platforms. With its reputation for swiftness and dependability, it’s no wonder Playwright is quickly becoming the first choice for developers who prioritize consistency in their web applications.
Why Playwright?
When selecting a tool, my primary concerns were speed, efficiency, and reliability. Here’s why Playwright checked all those boxes:
- Speed: Unlike traditional frameworks that have their limitations, Playwright interfaces directly at the browser’s API level. This not only ensures a quicker and smoother experience but also boosts reliability and simplifies maintenance.
- Efficiency: Its efficiency stems from its API-level interaction, enabling swift execution and surpassing other tools’ constraints. The backing of Microsoft and the endorsement from the developer community further vouch for its standing as a state-of-the-art tool.
- Reliability:
- Trusted Origin: Playwright hails from Microsoft, a stalwart in the tech world, adding an additional layer of trust.
- Strong Reception: Even as a newcomer, Playwright garnered rave reviews, distinguishing itself from its peers.
- Stellar Metrics: The impressive count of 1.3 million weekly downloads, despite its relative novelty, was a clincher in my decision. Check it out here.
Oh wow, you’re still here? My apologies for keeping you in suspense! Let’s not delay any further. Dive into the world of Playwright with me. A thrilling journey of installation and exploration is just a command away!
Let’s Get Practical!
Now that you’re primed and ready, let’s dive straight into the installation process of Playwright. It’s simpler than you might think!
Installing Playwright
On your command line, positioned at the root of your project (I’d recommend running in Administrator mode), punch in the following:

OR

(You can choose your desired version)
Encounter any pesky dependency conflicts or mismatches? Give this a shot:

OR

You can also try:

OR

A Quick Note:
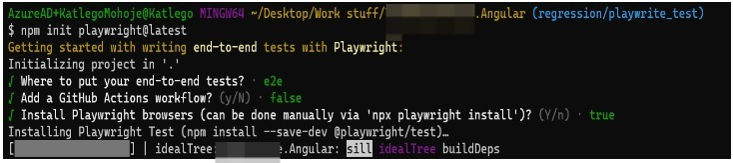
During installation, your terminal might prompt you to opt between TypeScript and JavaScript. TypeScript is the default selection. If you didn’t get this option, no worries! It just means TypeScript was chosen by default. For the upcoming prompts, hit ‘Enter’ for all three unless you have a specific configuration change in mind and you’re confident in your choices.
Post-Installation Overview
Once the installation wraps up, you’ll notice new additions within your project:
- Playwright.config.ts
- package.json
- package-lock.json
- tests/
- example.spec.ts
- tests-examples/
- Demo-todo-app.spec.ts
A Spotlight on Key Additions:
- Playwright.config.ts:
- Consider this your Playwright command hub. From choosing the browsers for testing to adjusting intricate settings, all your configurations live here. If you’re integrating Playwright into an ongoing project, its dependencies will neatly integrate into your package.json.
- The Test Folder (tests/):
- This is where your testing endeavors take flight. It houses example.spec.ts, a primer showcasing manual testing procedures.
When crafting your own tests, ensure you adhere to the [filename].spec.ts naming protocol. While some tutorials suggest omitting the .spec (e.g., ffwSndFlow.ts), my experiments suggest otherwise.
Configuration Tweaks
- Launchpad: Head over to Playwright.config.ts.
- Find the Object: Spot the line const config: PlaywrightTestConfig.
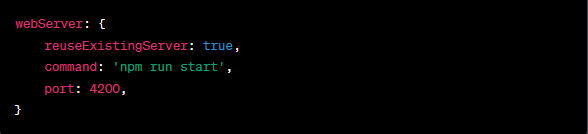
- Locate the webServer key: It’s likely commented out and looks something like this:

Bring it back to life by uncommenting and updating:

Reusing an Existing Port:
If you aim to utilize a port that’s already active, e.g. localhost:4200, you can include the following property:

By incorporating this setting, your configuration object would be structured as follows:
Quick Config Tips:
- testDir: ‘./tests’: By default, it guides Playwright to the tests/ directory. Storing your tests somewhere else? Remember to reconfigure this.
- timeout: 30 * 1000 – Your maximum test runtime. If it exceeds, the test breaks.
- Expected: { timeout: 5000 } – Maximum wait for expected outcomes before a test failure.
- fullyParallel: true – Keen on speed? This setting lets tests run concurrently, shaving down your total test duration.
Script Generation:
Prerequisites: Ensure testDir hasn’t been modified in the config or use your custom test directory. If unsure, check:

Let’s get crack-a-lacking 🙂
Step 1: Create a file with a descriptive name that resonates with your team. For instance, using names like ffwSndFlow.spec.ts or ddTnrFlow.spec.ts might be apt. In our setup, terms like “ffwSnd” and “ddTnr” correspond to specific products within the application, making them instantly recognizable to team members.
Step 2: Serve your application using, for instance, ng serve if using angular or the command your application utilizes to serve.
Step 3: On your command line, unfurl the command:

With everything in order, your main screen should illuminate with…
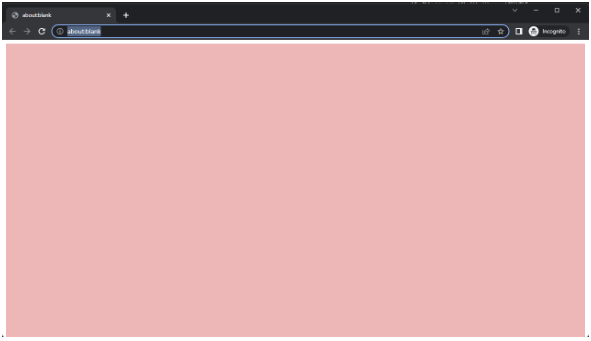
Step 4: Next up ,time to specify the application specific URL. Simply replace the placeholder about:blank with your desired address, just as you would enter it into a browser’s address bar.
For example: http://localhost:4200/home?appCode=25&vdn=12345&entrySale=SND.
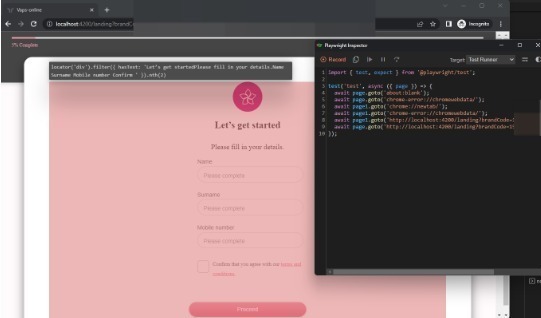
Step 5: Upon execution, you should notice the Playwright inspector tool activatedplaywright
NOTE:
With every interaction or click on the application, the Playwright inspector tool generates code. Exercise caution and diligence as you progress at this stage.
Step 6:
Navigate through your application, covering the extent you want the automation test to capture.
Running Tests
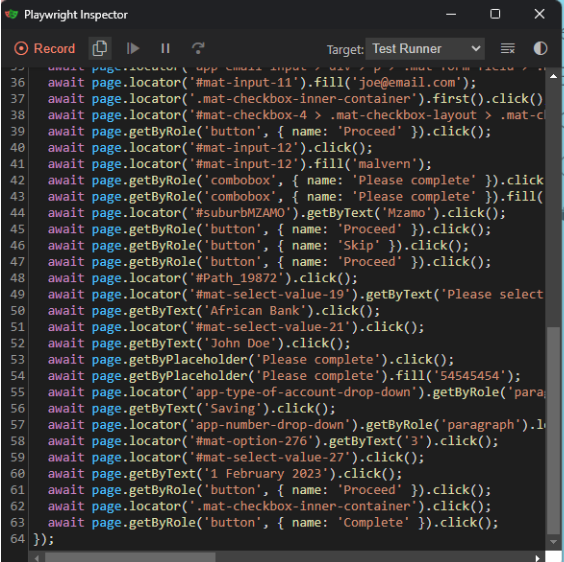
At this point, your Playwright inspector tool should be brimming with scripts, as shown below:
Executing Your Scripts
- Copying the Script:
Use the copy control icon to capture everything from the Playwright inspector.

- Pasting the Script:
Head to the directory you initialized in Script Generation section – Step 1 and paste the copied script into ffwTnrFlow.spec.ts or your filename.

- Running Your Tests:
Terminate any ongoing sessions with CTRL + C and utilize the following commands for specific test scenarios:
By Title (Headed Mode):

All Tests:

Specific Test File:

Set of Test Files:

Step 4: Depending on your configurations in playwright.config, you’ll either see a browser session showcasing the automated test or feedback directly in your terminal. After tests complete, the terminal provides a command to view a comprehensive report of the test(s) undertaken.
Following completion, you can expect to see test results either presented within an active browser window or detailed in the terminal. The terminal will also suggest a command allowing you to review a comprehensive report of the test(s) executed.
For a deeper dive with more commands and further clarity, do explore Playwright’s official documentation: Playwright Documentation 🎭

WRITTEN BY
Katlego Mohoje